Introduction to Handprint Crafts
There’s something magical about Christmas handprint crafts that captures a moment in time. As a mom of three, I’ve watched my children’s tiny handprints grow year after year, creating a timeline of memories through our holiday decorations. These simple yet meaningful projects aren’t just crafts—they’re keepsakes that tell the story of your child’s growth.
I remember the first time my oldest pressed his paint-covered hand onto construction paper. The mess was considerable (paint somehow ended up in his hair!), but the resulting Christmas tree handprint now hangs in our home every December, seven years later.
What makes handprint crafts so special for the holiday season is their simplicity combined with their sentimental value. You don’t need to be particularly crafty to create something beautiful, and the supplies are usually items you already have around the house.
Pro Tip: Before starting any handprint project, have baby wipes or a damp cloth ready for immediate cleanup. Trust me, this small preparation step saves a lot of stress when little hands start wandering!
Classic Handprint Christmas Tree
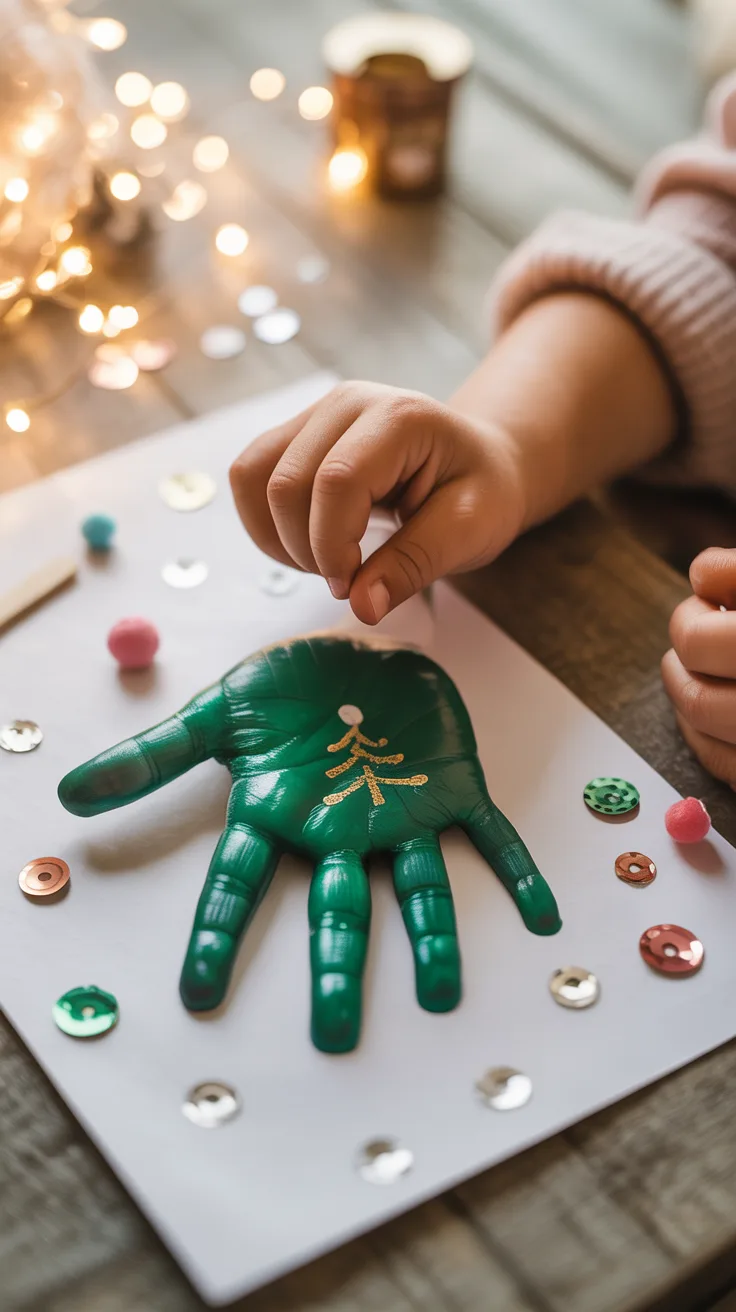
The handprint Christmas tree remains one of our family favorites year after year. It’s simple enough for toddlers yet can be elaborated on by older children for more complex designs.
- Gather your supplies: Green paint (washable is best!), white paper or canvas, paintbrush, and decorative items like sequins, glitter, or small pom-poms
- Prep your child’s hand: Paint the entire palm and fingers with green paint
- Create the tree: Press the painted hand onto the paper with fingers pointing down, creating a handprint
- Build the tree: Make multiple handprints, starting at the top and working down in a triangle shape, slightly overlapping each print
- Decorate: Once dry, let your child add “ornaments” using fingerprints with colorful paint or glue on sequins
- Add a star: Finish with a yellow star on top, either painted or cut from paper
Pro Tip: For a multi-year keepsake, create a new handprint tree annually on the same size paper and display them together to see how your child’s hands grow!
Santa Claus Handprint Art
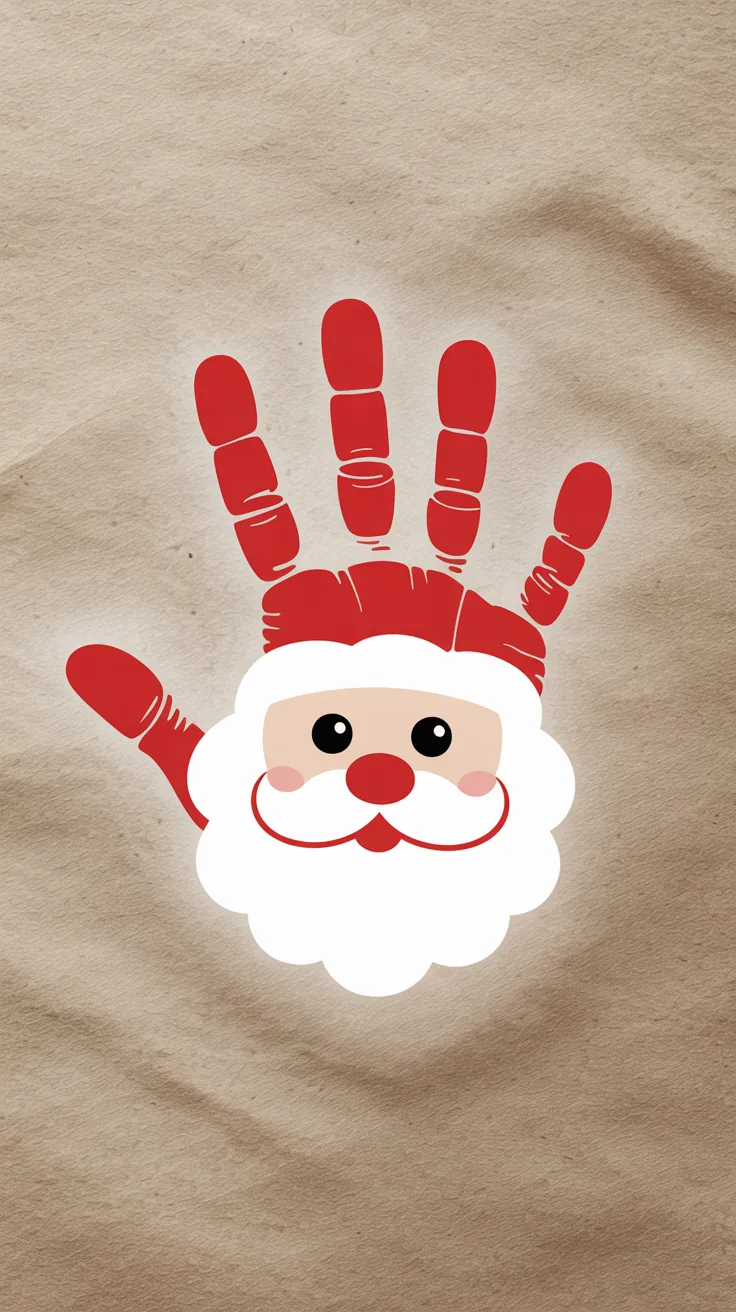
The first time I tried making Santa handprints with my twins, I forgot to let the red paint dry before adding the white beard—resulting in pink-bearded Santas! Now we know better, and this craft has become one of our annual traditions.
- Materials needed: Red and white paint, black marker, googly eyes (optional), construction paper
- Paint the palm: Cover your child’s palm and thumb with red paint
- Create Santa’s hat: Press the hand onto paper with fingers pointing upward—the thumb becomes Santa’s face while the palm and fingers form his hat
- Add details: Once dry, use white paint to add the beard around the thumb and the trim of the hat
- Finish the face: Draw eyes, nose, and mouth with a black marker, or glue on googly eyes for a 3D effect
Pro Tip: If working with multiple children, write their names and ages on the back immediately. You’d be surprised how quickly you can forget which Santa belongs to which child!
Reindeer Handprint Craft
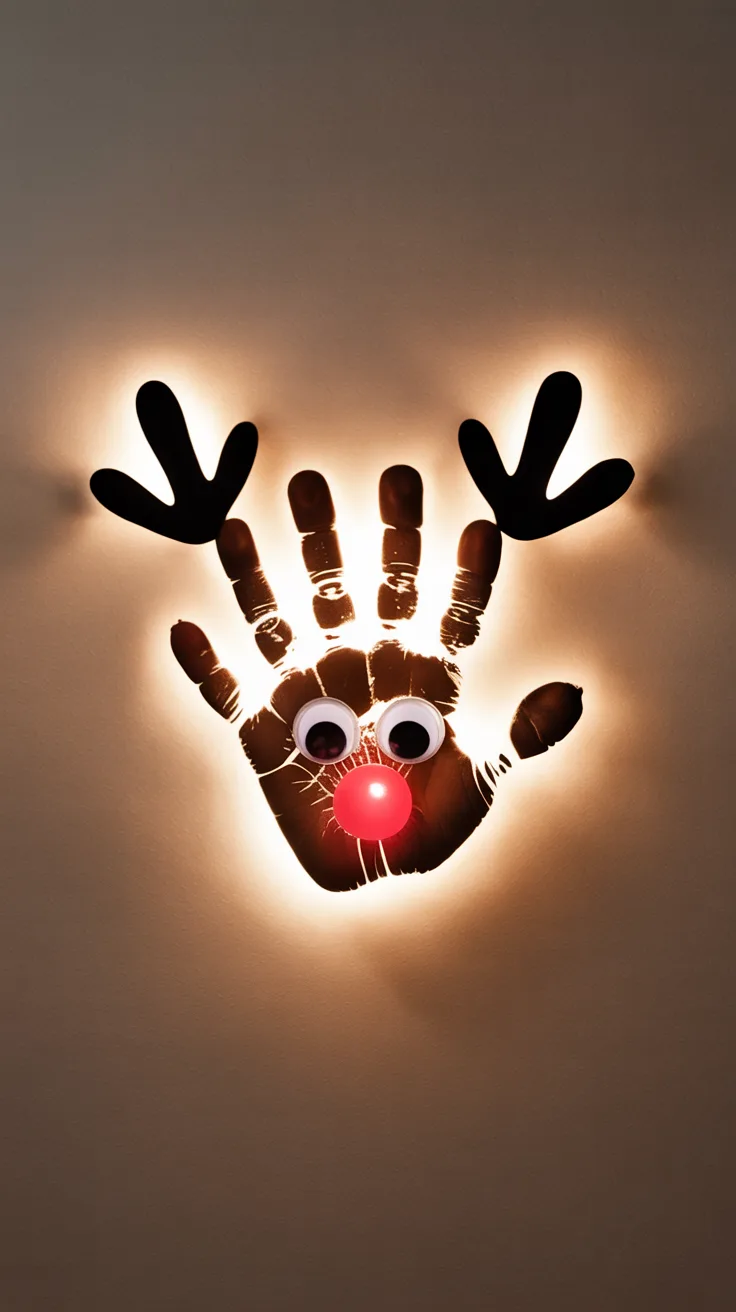
Reindeer handprints are perhaps the most recognizable of all the Christmas handprint crafts. The transformation from a brown handprint to Rudolph or one of his friends delights children every time.
- Start with brown: Paint your child’s entire hand with brown paint
- Position correctly: Press the hand onto paper with the thumb and fingers spread out—the thumb and pinky will be the antlers, while the three middle fingers form the reindeer’s face
- Let it dry: Allow the brown paint to dry completely
- Add features: Glue on googly eyes to the middle finger, or paint them on
- Create Rudolph: Add a red pom-pom or paint a red circle for the nose
- Extra details: Draw a mouth and add any other decorative elements
I once tried to rush this craft before a school holiday party and ended up with smudged reindeer that looked more like brown blobs. Lesson learned: always allow proper drying time between steps!
Pro Tip: To make this craft extra special, add a jingle bell to the reindeer’s neck using ribbon or string.
Snowman Handprint Ornament
Creating snowman ornaments from handprints gives you a decoration that can be enjoyed for years to come. Unlike paper crafts, these dimensional ornaments become treasured keepsakes.
- Materials: Clear or blue glass/plastic ornament balls, white acrylic paint, orange and black markers, ribbon
- Prepare the hand: Paint your child’s hand with white paint, covering the palm and fingers completely
- Apply to ornament: Gently wrap their hand around the ornament, pressing lightly to transfer the paint
- Create multiple snowmen: You can place 2-3 handprints around the ornament
- Add details: Once dry, use markers to draw eyes, carrot nose, mouth, buttons, and arms
- Finishing touch: Tie a festive ribbon through the ornament top
The first year we made these, I didn’t realize how slippery painted hands and glass ornaments would be! Now we place the ornament in a small bowl to stabilize it during the handprinting process.
Pro Tip: Write your child’s name and the year on the bottom of the ornament with a permanent marker before hanging.
Angel Handprint Craft
Angel handprints make beautiful cards or decorations and hold special meaning during the holiday season. They’re also one of the simpler crafts, perfect for when you’re short on time but want something meaningful.
- Gather supplies: White paper, white and gold paint (or whatever colors you prefer), markers, glitter (optional)
- Create the base: Paint your child’s hand with white paint
- Position properly: Press the hand onto paper with fingers pointing downward—the palm becomes the angel’s body while the fingers form the wings
- Add a head: Once dry, paint or draw a small circle above the handprint for the angel’s head
- Create a halo: Use gold paint or glitter to add a halo above the head
- Final touches: Draw a face on the head and add any decorative elements to the wings or dress
Pro Tip: For a more dimensional angel, cut out the handprint after it’s dry and mount it on colored construction paper with a small gap between the layers.
Handprint Wreath
A handprint wreath makes for a stunning door decoration that showcases the whole family’s hands. I’ve found this to be one of the most collaborative Christmas handprint crafts we make each year.
- Materials: Green construction paper, scissors, glue or tape, red ribbon, decorative elements
- Trace hands: Trace each family member’s hand on green paper multiple times
- Cut out: Cut out all the handprints
- Arrange in a circle: Overlap the handprints in a circular pattern, with fingers pointing outward
- Secure together: Glue or tape the handprints in place
- Add a bow: Attach a red ribbon bow at the bottom or top of the wreath
- Decorate: Add small ornaments, bells, or other festive elements
One year, we invited grandparents to add their handprints too, creating a multi-generational wreath that became an instant family treasure.
Pro Tip: For a wreath that lasts multiple seasons, laminate the handprints before assembling or spray with a clear sealer after completion.
Conclusion
These Christmas handprint DIY crafts offer more than just holiday decorations—they capture a moment in your child’s development that you’ll treasure for years to come. As my children have grown, our collection of handprint art has become a visual timeline of their childhood, bringing back memories each time we unpack our holiday decorations.
Don’t worry about perfection with these projects. The smudges, the imperfect finger placements, and even the occasional tear in the paper all become part of the charm. What matters most is the experience of creating together and the memories you’re preserving.
I encourage you to start your own handprint tradition this Christmas. Whether you choose one craft or try them all, you’re creating keepsakes that will bring joy for many holiday seasons to come.
Frequently Asked Questions
What materials are needed for handprint crafts?
Most handprint crafts require basic supplies like washable paint, construction paper, markers, and glue. Depending on the specific craft, you might also need items like googly eyes, pom-poms, glitter, or ornament balls. I recommend having baby wipes on hand for quick cleanup!
How can I preserve handprint crafts for years to come?
To preserve paper handprint crafts, consider laminating them, spraying with a clear sealer, or storing them in acid-free page protectors. For ornaments, a clear acrylic sealer helps protect the paint. Always store them carefully between seasons—I learned the hard way after crushing our first batch of handprint ornaments by packing them improperly.
Are handprint crafts suitable for all ages?
Absolutely! Even babies can participate with help from adults. Toddlers and preschoolers usually enjoy the sensory experience, while older children can add more detailed decorations. I’ve found that even my preteen still enjoys making a yearly handprint craft, especially when we compare it to his tiny prints from years past.
What are some tips for getting clean handprints?
For cleaner handprints, apply paint evenly with a foam brush rather than dipping hands directly into paint. Practice the hand position before applying paint. Work quickly before the paint dries or the child gets fidgety. And remember—sometimes the imperfect prints make the most endearing keepsakes!
Can these crafts be used as gifts?
Handprint crafts make wonderful gifts for grandparents, other relatives, or special friends. In our family, grandparents have come to expect a handprint creation each Christmas—it’s